Single Sign-On
Canaille implements several OAuth2 and OpenID Connect specifications that allow users to log themselves once on Canaille, and have access to other applications without logging in anew.
Installation
To use the single sign-on feature, Canaille needs to be installed with the oidc package extra.
Then the feature is enabled by default, but can be disabled with the ENABLE_OIDC configuration parameter.
Discovery endpoints
The OAuth2 discovery endpoint is located at /.well-known/oauth-authorization-server and the OpenID Connect discovery endpoint is located at /.well-known/openid-configuration.
These endpoints return a JSON discovery document that lists every other endpoint (authorization, token, userinfo, JWKS…) along with the server capabilities, so that compliant clients can configure themselves automatically from the issuer URL alone.
Dynamic client registration
The easiest way to register a client is to let the client register itself.
By default, dynamic client registration requires a JWT registration token. Generate one with the canaille jwt registration command:
canaille jwt registration
Then pass this token to the registration endpoint as a bearer token:
curl \
   --request POST \
   --header "Authorization: Bearer $REGISTRATION_TOKEN" \
   --header "Content-Type: application/json" \
   --data '{"redirect_uris": ["https://client.example/callback"], "client_name": "Example client"}' \
   https://auth.example.test/oauth/register
The command generates a token with the client:register scope.
Canaille must have a configured ACTIVE_JWKS and SERVER_NAME so the token can be signed and issued for the right server.
For test environments where authenticated registration is not needed, enable DYNAMIC_CLIENT_REGISTRATION_OPEN to allow clients to register without a token.
Manual client registration
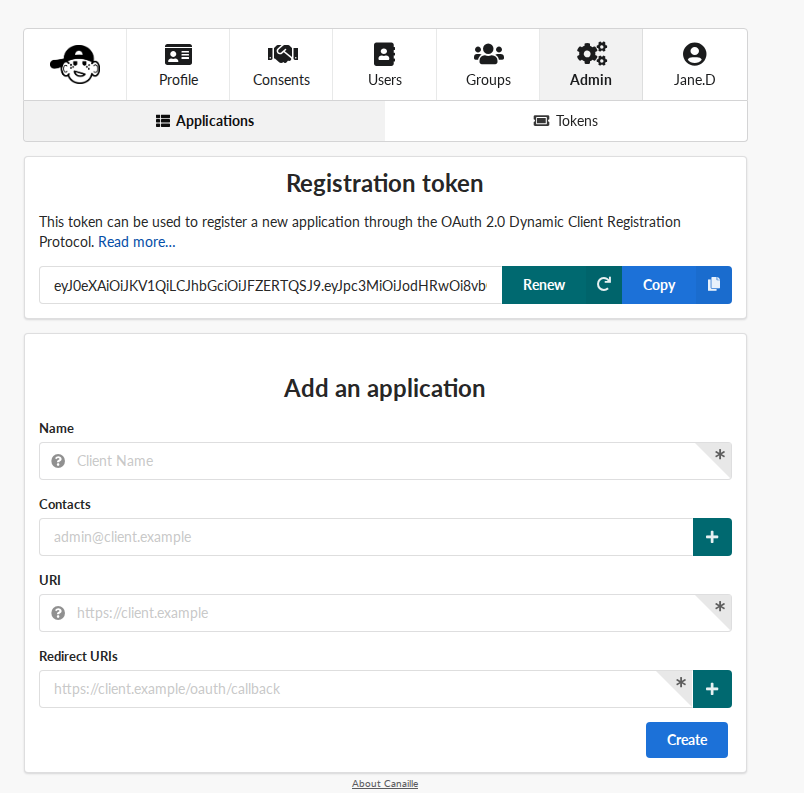
The client addition page.
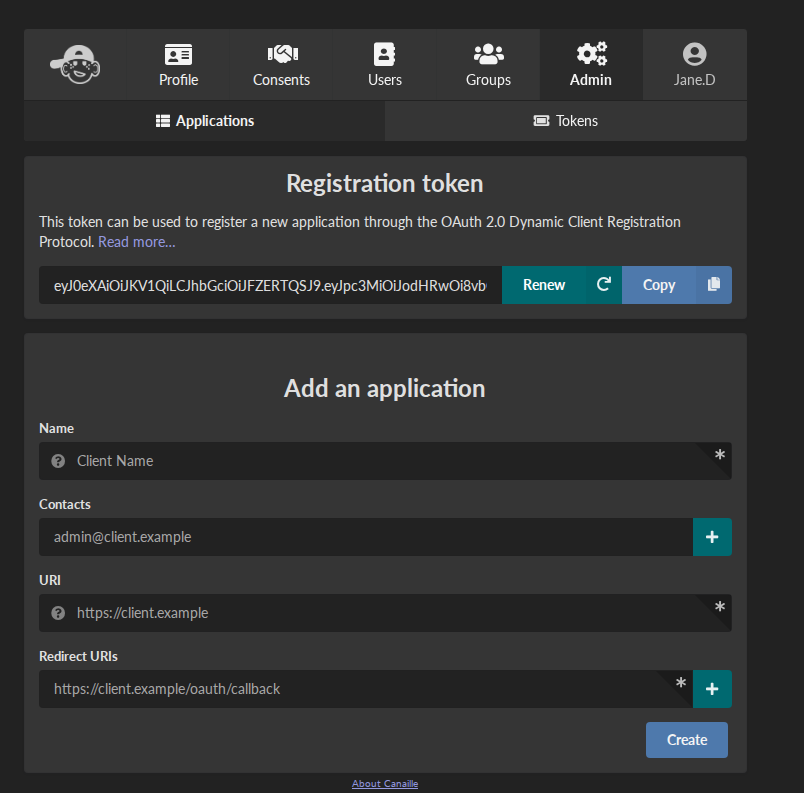
The client addition page.
Users with the right MANAGE_OIDC permission can manage OIDC clients through the web interface.
Here are some details about the fields in the client edition and registration form:
Name
This is the name that will be displayed on the web interface, and notably on the consent page.
Contacts
Those are the email addresses of people responsible for the client.
URI
URL string of a web page providing information about the client.
Note
This URL is used to determine the allowed origin for cross-origin requests (CORS) to OIDC and SCIM endpoints. This enables Single Page Applications to directly call these endpoints from the browser.
Redirect URIs
URIs for use in redirect-based flows such as the authorization code and implicit flows.
Post logout redirect URIs
URIs that the client may redirect users to after logging them out.
Grant types
Grant types that the client can use at the token endpoint.
password allows clients to authenticate users by forwarding their password to the authorization server. This is considered an unsecured flow and is removed from the incoming OAuth 2.1 specification. Only enable this grant when the client don’t support other more secured flow.
authorization code redirects end-users to the authorization server, optionally ask for their consent, then redirect users to the client application with an authorization code that it can exchange in a second time with an access token. This is the most common grant type.
implicit redirects end-users to the authorization server, optionally ask for their consent, then redirect users to the client application with an access token. This grant type is less secured than authorization code, and is only intended to be used for client applications that cannot guarantee the secrecy of their credentials, such as SPA.
hybrid is a mix of implicit and authorization code, and share the security defaults of implicit.
refresh token asks for a token that cannot be used to access protected resources, but can be used to get a new access token without user manual intervention. This is generally useful.
client credentials is intended to be used for server-to-server applications, when no user interaction is expected. For example this is the grant type that should be used for provisioning.
JWT bearer allows clients to exchange a JWT signed by the authorization server against an access token.
Scope
Kinds of information the client can request about users. See Claims returned to applications for the available scopes and the claims each one provides.
Response types
Response types that the client can use at the authorization endpoint.
code is used in the authorization code and can be used in the hybrid authorization flows.
token and id_token are used in the implicit and can be used in the hybrid authorization flows.
Token endpoint authentication method
Authentication method that the client will use at the token endpoint.
none indicate clients do not authenticate on the token endpoint. This is considered unsecured, and should only be used for implicit authorization flow.
client_secret_basic expects clients to pass their credentials in the request headers.
client_secret_post expects clients to pass their credentials in the POST payload of the request.
private_key_jwt passes a JWT signed with the client private asymmetric keys in the request POST payload. This is considered very secure, more so if the client publishes its public keys on the internet using the
jwks_uriattributes.client_secret_jwt passes a JWT signed with the client
secretattribute in the request POST payload. This is considered secured, although less than private_key_jwt, but this does not require the client to publish its asymmetric keys, so it might be more easier to set-up.
Audience
The other clients that are intended to use the tokens emitted by this client.
Logo URI
An URL for the logo of this client.
Terms of service URI
URL to the terms of service of the client.
Policy URI
URL to the privacy policy of the client.
Software ID
Unique identifier for this client, that should be stable in time and common for all identity providers.
Software Version
The version of the client.
JSON Web Keys
The public JSON Web Keys of the client.
JSON Web Keys URI
The URI that points to the public JSON Web Keys of the client.
Trusted
Whether the clients needs to display consent dialogs.
Configuring the client application
Once the client is registered, configure the application itself. Most OIDC clients only need three things:
the Issuer URL: your Canaille base URL (e.g.
https://auth.example.org). Clients that support discovery fetch every endpoint from the Discovery endpoints automatically;the Client ID and Client Secret obtained during registration;
the scopes the application should request (see Scope).
Applications that do not support discovery must be configured with each endpoint manually; you can read their values from the discovery document (see Discovery endpoints).
Claims returned to applications
The Scope requested by a client controls which claims Canaille returns in the ID token and at the userinfo endpoint.
Request scopes explicitly: groups, address and phone are not included in profile.
Scope |
Claims returned |
|---|---|
|
|
|
|
|
|
|
|
|
|
|
|
Mapping groups and roles
OpenID Connect does not standardize roles or groups, so this is usually the trickiest part of an integration.
Request the groups scope: Canaille then adds a groups claim to both the ID token and the userinfo response, containing the list of the user’s group display names, for instance:
{
  "sub": "alice",
  "groups": ["admins", "staff"]
}
Map this claim to your application’s roles or permissions. Every application does this differently (an attribute path, a role-mapping table, an allowed-groups list…): look for “OIDC group mapping” or “role mapping” in your application’s documentation.
Customizing the claims
Claims are produced from Jinja templates, configurable in the UserInfoMappingSettings section (CANAILLE_OIDC.USERINFO_MAPPING).
A user variable is available in each template.
If an application expects a claim under a different value, adapt the mapping.
For example, to expose the email address as preferred_username instead of the display name:
[CANAILLE_OIDC.USERINFO_MAPPING]
PREFERRED_USERNAME = "{{ user.preferred_email }}"
Common integration pitfalls
Redirect URIs must match exactly. Scheme, host, port and path must be identical to what the application sends, including or excluding a trailing slash.
Prefer Authorization Code with PKCE. The supported
code_challenge_methodsare advertised in the discovery document (Discovery endpoints); useS256when the client offers a choice.Match the token endpoint authentication method. The method configured on the client (see Token endpoint authentication method) must match what the application sends. A mismatch is a frequent cause of
invalid_clienterrors.A nonce is required by default. Canaille enables
REQUIRE_NONCE. If a client does not send anonce, either fix the client or disable this option.The issuer must match the public URL. Behind a reverse proxy, set
SERVER_NAMEand forward the appropriate headers, otherwise theissueradvertised in the discovery document (Discovery endpoints) and in the issued tokens will not match what clients expect. See Deployment.The consent screen can be skipped for clients matching a
TRUSTED_DOMAINSentry or marked Trusted.
Server key management
Key generation
The canaille jwk create command can be used to generate JSON Web Keys.
To install a server key, put the output of the command in the ACTIVE_JWKS configuration parameter.
The OpenID Connect specification imposes to have at least one RSA key among the active keys.
Key rotation
It is considered a good practice to rotate the authorization server keys on a regular basis.
Canaille has two configuration parameters for key management: ACTIVE_JWKS
and INACTIVE_JWKS.
Only the keys listed in the former are used to sign tokens, but keys listed in both are used to verify tokens.
The keys listed in both are displayed in the server JWKS endpoint, so clients can know that JWTs signed with inactive keys are still valid.
To rotate keys, simply pass a key from ACTIVE_JWKS
to INACTIVE_JWKS and restart Canaille.
After a few time, you can purge the inactive keys.